The Spine is the core piece of a resistance training gym or workout space. With this guide, we’ll show you how to set up the Spine, give you some of the specs on each, establish safety and training zones, and get you started with some of the best exercises for your full-body workout.


The Spine is an American-made steel anchor that gives you a low-profile workout station in any gym, personal or commercial, while taking up almost no space at all.
The Spine comes in multiple sizes, from the largest being 78-inches with 13 anchor points of differing heights, to the smallest of 48-inches with seven (7) anchor points. Stroops also offers a Mini version of the 48-inch Spine, a low-cost, lightweight version of the original for less intense training or rehab.
In order to best suit your workout space, the Spine comes in three different types:
- 78-inch: This is our standard size of Spine, and works really well for large workout spaces such as gyms and performance centers, or in a personal training studio. This size comes with 13 anchor points with thicker rungs to anchor from. This is the best anchor to use if you’re doing exercises where your whole body weight may go against the anchor—such as resistance sprints or jumping with the Son of the Beast.
- 48-inch: While just as strong as the larger size, the 48-inch Spine anchor is a lower-profile version of the Spine that gives you seven (7) anchor points. If you don’t need as much variance on your line of pull, this is a great solution for a lower price.
- 48-inch Mini: The Mini Spine is built as a lightweight alternative with a 150-pound weight capacity and seven (7) anchor points. Particularly with its lower cost, the Mini is well-suited for resistance band training at lower intensities, such as for rehabilitation or mobility exercises. The rings on the Mini are thinner as well.
Each Spine is made with American steel in our facility in Clearfield, Utah.

The Spine can weigh up to 40 pounds based on size selection, so take care in assembling and setting it up. Once set up, the Spine is capable of 350 pounds of weight resistance during your workout. The 48-inch Mini has a 150-pound capacity due to its narrower pole and thinner rings.
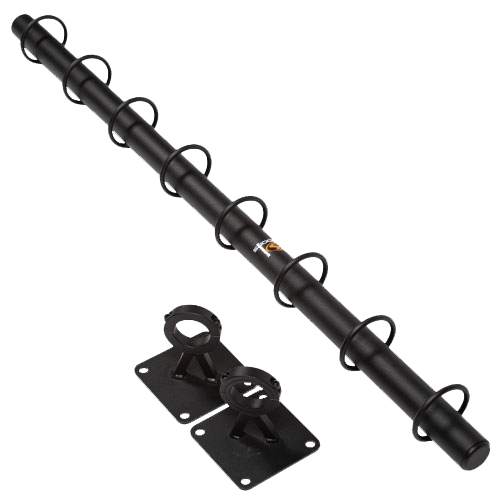
Each Spine contains the same basic components: the Spine itself, two (2) mounting brackets, and two (2) U-bolts to fasten the brackets.
You’ll notice that the mounting brackets have four diametrical holes drilled into them for mounting. It’s not necessary to fasten all four points available to keep the Spine secured to your wall. We simply designed it in mind of working with how your wall is constructed, whether your studs/beams are vertical or horizontal. You should also work with a specialist or contractor to determine which hardware is best suited for the surface you are mounting on.
To set up the Spine:
- Measure and mark the distance between your mounting brackets. We recommend the brackets be mounted so that the Spine is fastened roughly 10-12 inches from each end when fully assembled.
- Secure the mounting brackets to the wall with a wrench, drill, or ratchet.
- Place the Spine onto the mounted brackets so that each bracket is set in between the first and second ring on each end.
- While holding the Spine in place, take one U-bolt and place it on the top bracket to secure the top end of the Spine, then use an Allen wrench to screw the bolt into the bracket. You can let go of the Spine once the bolts are securely screwed on.
- Take the second U-bolt and repeat the process for the bottom bracket.
- Once all bolts are screwed in, do a final tightening of each bolt to ensure the Spine stays sturdy and in place during your exercise.

Once you have the Spine set up and ready to go, learn how to use your space by setting up safety and training zones. These zones help you make the best of your resistance bands and stay safe during exercise, and you can easily mark these zones by using Agility Markers or anything else that won’t pose a hazard to your workout area.
When your resistance band is anchored to the Spine, the area between the Spine and the furthest point your band extends without stretching is called the safety zone. This area is where you can set up or finish your workout and engage and disengage from your band. Place a marker at the end of this zone.
After marking the safety zone, stretch your resistance band to its max capacity. With Slastix resistance bands, you can tell what max capacity is because the safety sleeve will be fully stretched out without wrinkles. Mark off the point roughly 6-12 inches before you reach this distance, and the area between your two markers is your training zone. This area will enable your resistance band to give you constant resistance and define the pace you have to exercise.
Beyond your training zone is what would be called the “danger zone.” You should not stretch your band beyond the end marker of your training zone. Doing so heavily increases wear and tear on the band and makes it more likely that it will break. You also place yourself in danger of losing balance or overworking your muscles, which can potentially lead to injury.
