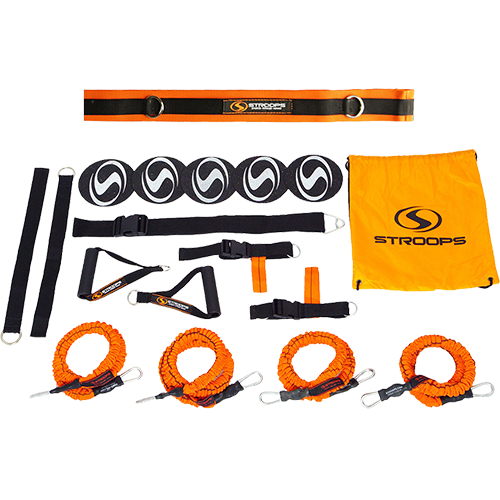
There’s no better way to get a full experience with Slastix resistance band training than with the VITL Kit. With this guide, learn how to set up every part of your VITL Kit, how to set up safety and training zones, and where to get started on a full-body workout.
The VITL Kit is an all-inclusive 18-piece portable training system that has everything you need to set up your full workout space in any location.
The VITL Kit includes a Spine Strap, two Cloth Anchors, two Foot Straps, two Textured Grip Handles, a Universal Swivel Belt, five Agility Dots, four Slastix resistance bands of your chosen resistance level, and a portable carrier bag with a cinch top.
Fully set up, the VITL Kit gives you nine (9) possible anchor points, seven on the Spine Strap and two from the Cloth Anchors, and you’ll have three different ways to attach to your resistance bands, either from your foot using the Foot Strap, by hand with the Textured Grip Handle, or with your whole body using the Universal Swivel Belt.
The VITL Kit has several working parts. Here’s how to make them work the best for you.
SPINE STRAP
The core anchor piece of the VITL Kit is the Spine Strap, a seven-point anchor you can set up on any door up to 8 feet. To set up the Spine Strap:
- Bring the thin, black strap all the way up to the buckle at the top. Make sure that the actual spine portion of the strap with the Stroops logo is facing outside of the loop while the softer orange side is facing inside.
- Pull the strap through the buckle from back to front. Bring it through just enough to make a large loop.
- Wrap the Spine Strap around your door. There are two stitched fabric lips near the top of the strap that should go on either side of the top of the door. These are to stabilize the strap.
- Once the Spine Strap is in place, pull on the black strap behind the door until the Spine Strap is firmly fastened to the door.
CLOTH ANCHORS
Cloth Anchors make it possible to use your Slastix resistance bands in almost any location At 18 inches long, it will suit your needs in anchoring to any object up to about 15-16 inches in diameter. To set up the Cloth Anchor:
- Find your anchor point, whether it’s a tree, pole, fence link, or anything else feasible.
- Wrap the anchor around the object,
- Pull the clip through the loop on the other end and pull it tight so that the clip faces the direction of your workout space.
ATTACHMENTS
The five attachments included with the VITL Kit—two Textured Grip Handles, two Foot Straps, one Universal Swivel Belt—are a cinch to use. Each attachment connects to your Slastix resistance band at the D-clip.
If worn correctly, the Foot Strap comes with two connection points, one at the top of your foot and one behind your heel.
When working with a resistance band, even with Slastix resistance bands, it’s important to consider how best to maintain your resistance bands and other equipment through smart exercise techniques. One of these techniques is establishing safety and training zones.
Training zones help you to effectively measure the capacity of your equipment. It’s the best way to avoid accelerated breakdown of your band, prevent injury, and maximize your workout. Marking off your training zones is also made easy by the inclusion of your five Agility Dots. These markers define your zones, and you can also use them to set up agility exercises like hurdles and quick-steps.
Start establishing your zones by attaching the resistance band to your anchor at mid-level. Extend the band up to the point where there is no slack left but you are not yet stretching it out. The distance between you and your anchor at this point is your “safety zone.” The safety zone is where you can safely engage and disengage from your resistance band, connect to attachments, and set up your exercise.
Once you’ve marked this area with an Agility Dot, stretch your Slastix resistance band out until its max capacity. With Slastix, you’ll know you’ve reached max capacity when the safety sleeve on the outside of the band is fully extended so there are no more folds or wrinkles in it. When you’ve fully stretched out the band, set an Agility Dot as a marker roughly 12-18 inches back from that point. The area between your safety zone and this marker designates your actual training zone. Do your exercises in this area to experience constant resistance to optimize your workout.
Outside of the training zone is what is termed the “danger zone.” Extending your band past your training zone will hasten its breakdown, shorten its life, and potentially put you at risk of injury in the process by a possible breakage or an uncontrollable counter-resistance.
You can further establish your zones by defining your horizontal area with more Agility Dots, placing markers in each direction for exercises that involve more lateral movement, such as side lunges.


