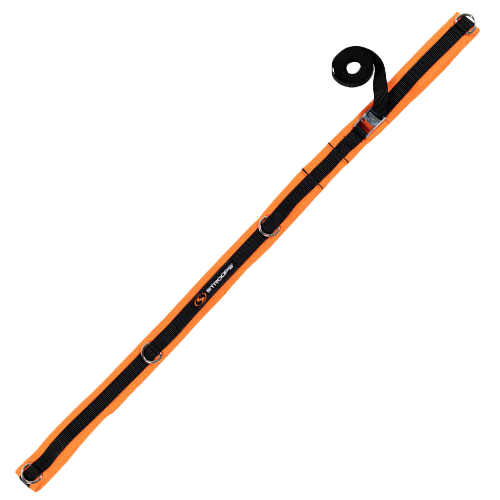
Welcome to the Spine Strap, the perfect at-home anchor for full-body resistance training. With this guide, you’ll learn how to set up your Spine Strap and how to set up your safety and training zones, and you’ll get some great exercises to get you started.
With the Spine Strap, you can set up your workout station anywhere you have a door, whether that’s your office, your home, or in a personal gym.
The Spine Strap is compatible with any door up to 85-inches tall. At that height, you’ll be able to work with seven (7) different anchor points of varying heights, from just above the ground to near the top of the door. This will give you more freedom in how you anchor your Slastix resistance Bands and diversify your exercise routine.
When fully set up, the Spine Strap is a 7-point door anchor going top to bottom of any door up to 85 inches tall (roughly 7 feet). If the door you are trying to anchor to is taller than 85 inches, you can supplement your anchor with the Spine Strap Extension, which will make your Spine Strap compatible with doors up to 9 feet tall.
Here’s how you set up the Spine Strap:
- Bring the thin, black strap all the way up to the buckle at the top. Make sure that the actual spine portion of the strap with the Stroops logo is facing outside of the loop while the softer orange side is facing inside.
- If you’re using the Spine Strap Extension for a taller door, take the narrow black strap on the Spine Strap and pull it through the buckle of the Spine Strap Extension.
- Pull the strap through the buckle from back to front. Bring it through just enough to make a large loop.
- If the Spine Strap Extension is attached, pull the strap of the Extension through the buckle of the Spine Strap.
- Wrap the Spine Strap around your door. There are two stitched fabric lips near the top of the strap that should go on either side of the top of the door. These are to stabilize the strap.
- Once the Spine Strap is in place, pull on the black strap behind the door until the Spine Strap is firmly fastened to the door. Your workout station is now ready to go!
- If attached, pull tight on the Spine Strap Extension as well.
Once you’re finished, the Spine Strap can suit up to two (2) users at a time and handles as max weight capacity of 150 pounds.
When using the Spine Strap, or any other resistance band anchor, it’s important to mind your workout space. Establishing your workout zones will help keep you safe, keep your equipment durable, and define the parameters of your movements.
Stroops’s unique line of Agility Markers are perfect for marking your workout zones, but you can also use any other marker you have available that doesn’t put you in danger of slipping or tripping over it.
To establish these zones, first anchor your resistance band to the midpoint of the Spine Strap. Then, extend the band up to the point that there is no longer any slack, but don’t stretch it. Mark off this point. The area between the Spine Strap and this point is your safety zone. In this zone, you can set up or finish your workout, and engage and disengage safely from your resistance band.
From your safety zone, stretch your resistance band to its max capacity. With a Slastix resistance band, this is easy to tell because the safety sleeve will be fully lengthened out without any folds or wrinkles. When you reach this point, mark off the spot roughly 6-12 inches short of that point.
The area between your first and second marker is your training zone. Inside of this area, you’ll be able to do all of your training with constant variable resistance from your band, while you’ll also keep your band durable by not maxing it out or hyper-extending it. When you’ve finished a workout, simply return from the training zone to the safety zone to disengage from the band or start a new exercise.
The area beyond the end of your training zone can be referred to as the danger zone. Don’t stretch your band this far for any reason. Doing so could put you at risk of injury and certainly will put exponentially more wear and tear on your resistance band.

