Whether you’re still considering the Revolution Anchor or you’re already unpacking it in your gym, one sure thing is that it’s arguably the most versatile resistance band anchoring system in the industry. With this guide, you’ll learn how to set up the Revolution Anchor, how it can move around your space, and how to use it in group settings.


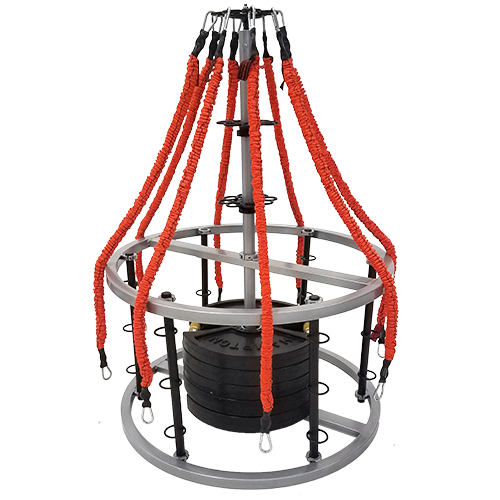
The Revolution Anchor equips you with up to 42 possible anchor points for Slastix resistance bands. At full construction, the anchor is 46 inches high—21 inches from the base—and 34 inches wide to be able to fit through most doorways. The structure weighs a total of 60 pounds without added weights.
To steady the Revolution Anchor, you can add up to 9 plates in the base to hold it down. This will make it possible for the anchor to hold steady whether you’re doing light exercise like pilates or opting for intense training with battle ropes or plyometrics. The anchor points are available from low- to mid-height to alter your line of pull.

To set up the Revolution Anchor:
- Lay out and account for all pieces in the structure: one (1) top ring, one (1) bottom ring, one (1) center anchor pole, six (6) 3-rung miniature Spine anchors, two (2) 8-point stationary anchors, and one (1) swiveling 8-point top anchor. Some small components are also included.
- Loosen the screws on each clamp around the circumference of each ring.
- The difference between the bottom and the top ring is that the top ring also has a clamp in the center of it along with the ones around it. Loosen this screw as well.
- Lay the bottom ring flat on the ground with the holes facing up, and place each of the six miniature Spines into each hole with the anchor rings facing outward.
- Take the top ring and secure it onto the Spines by pushing each Spine shaft through a corresponding hole.
- Make sure when placing the top ring that the crossbar is aligned parallel to the crossbar on the bottom ring.
- Using the Allen wrench supplied to you in the setup, tighten the clasps on the top and bottom for each Spine.
- Ensure that each clasp is tightened at an equal height.
- With the main body set up, take the center pole and two washers, one standard size and one thin one. On the end with a narrow point sticking out, place the stand washer on first, followed by the thin washer.
- Place the swiveling anchor on top of both washers, then secure it by adding the second standard washer, then tightening on the black bolt.
- To ensure your swiveling anchor can move freely, once you’ve fully tightened the bolt, loosen it roughly two full rotations to take the pressure off the swivel.
- Take your two stationary anchor rings and loosen the clasps on each, then slide them up the pole from the bottom. Once in place, tighten the clasps with the Allen wrench.
- When doing this step, note that the clasps are meant to be on the bottom side of the anchor ring when attaching to the pole.
- Once on the pole, the stationary rings and the swivel ring should be roughly 8-10 inches apart from each other.
- Both the base and pole of the Revolution Anchor are now assembled. Prior to combining the two, weigh down the anchor by placing weight plates of your own supply and choosing in the center of the base, aligning the middle of each plate with the center clasp on the bottom ring.
- With the plates in place, take the center pole with your multi-point anchors and slide it from the top through the hole in the top crossbar, and nestle it into the center of the plates and the bottom crossbar.
- Use the Allen wrench to tighten the clasp on the top crossbar around the center pole until it is locked in place.
- Give one last check on each clasp with the Allen wrench over the whole structure to ensure that it’s as tight as it should be, and then you’re done.
The main thing that separates the Revolution Anchor from other anchor types is just how many people can get in on the action at once. The multi-point anchoring system comfortably allows up to eight users at once.
How does that work in practice? The Revolution Anchor serves as the centerpoint of your fitness space with your workout partners and clients all around it. Don’t worry about hogging your space for other exercises later on since removing it is just a matter of tipping it over and rolling it away.
With a full workout group of six or more people, your clients and fitness partners will work as a team to move together. Using the swiveling anchor ring, users can add more range of motion by circling the Revolution Anchor as a group.
When you have multiple users working together on the Revolution Anchor, it’s best to have the users do their exercises together. Unified movements in sync with other users will keep the Revolution Anchor the most balanced as it resists tension from opposite directions.