The Performance Station is an all-inclusive workout center that is built for any gym, rehab, or training center. With this guide, you’ll learn about the different options and attachments you can get with the Performance Station, how to set it all up in your workout area, and some safety tips on using it after setup.


Whether you’re setting up your home gym, stocking your commercial gym, or establishing your personal training center, the Performance Station is the end of having to traverse through a whole gym to access every single machine you need for your workout.
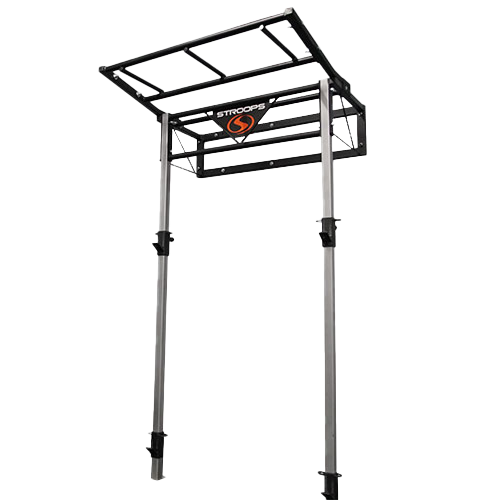
Already included with the Performance Station are two adjustable J-hooks to hold your barbell, a storage rack for exercise equipment, and numerous connection points for resistance band training and anchoring.
This wall-mounted squat rack integrates barbell training with Slastix resistance band training. There are numerous customization options to make it work the best for your space and exercise needs.

The Performance Station features unique attachments to give you an all-inclusive workout experience.
The J-hooks on the Performance Station serve a dual purpose. First, they work for spotting purposes with the capacity of holding up to a 350-pound Olympic barbell. Second, each J-hook has twin anchor points from which you can attach your Slastix resistance bands for a workout. With four total anchor points spaced well apart from each other, it’s easy for you and a partner to train at the same time.
The J-hooks are also adjustable with a back end pin that raises and lowers the hook to variate your line of pull with your resistance bands, or to adjust the level of where you need your weights, whether you’re squatting, benching, or otherwise.
The structure of the Performance Station makes it possible to turn the top of the station into a storage area that keeps all your exercise equipment safely out of the way. Store medicine balls and exercise balls up on top of the station.
In addition to that, the thinner steel racks on the sides make it possible to clip and store your Slastix resistance bands.
The monkey bar attachment, should you choose to include it, is attached to the top storage rack to give you more variety in how you can do bodyweight training with the Performance Station. The station already has a pull-up bar just below the logo, but with the monkey bar attachment, you’ll have more space than before to hang on the bars. You’ll also have horizontal bars to enable swinging and moving around on the bars.
The Performance Station is a large piece of equipment, so pay close attention to these setup instructions to ensure that your station is properly assembled and secured for the most intense of workouts.
- Lay out the long silver set pieces. These are the pillars of your Performance Station. Have them arranged so they are parallel with the panels on the same side. Obtain a J-hook, and place it on the pillar by applying it to the top of the pillar, then pulling the pin on the back out to slide it all the way on. Repeat this process with the second J-hook. Slide each J-hook down far enough that it clicks into one of the holes.
- Take a long bolt and slide a washer onto it. Locate a side bracket and align it on the outside of the pillar so that the shorter flat end is in contact with the outside edge of the pillar. Align the cross-divider (the pull-up bar portion with the Stroops logo) on the inside of the pillar. Use the long bolt with the washer to slide through each piece to connect it. Use your fingers to loosely secure the bolt on the other side with another washer and a nut. Repeat the process, securing all four points, two on each pillar, to secure the side brackets and the cross-divider.
- Use a ¾-inch ratchet and a wrench to tighten the nuts and bolts just enough to hold the brackets in place, then turn the structure over so that it is balanced on the brackets.
- Locate the single crossbar; align it with the top of the side brackets so that it spans the width of the structure and the holes match up about 8 inches behind the cross-divider. Secure it in place with two long bolts on each side of the bar.
- [OPTIONAL] If you purchased the Monkey Bar attachment, follow these instructions—While performing Step 4, also align the monkey bar brackets to go on the top of the side brackets with the thin panel facing down onto the side bracket in alignment with the holes the bolts will go through. Secure all three parts together with the long bolts. You’ll now have the crossbar secure with the monkey bar brackets sticking outward and slightly up.
- Secure the monkey bars themselves by bolting each end, four long bolts in total.
- With all pieces and attachments in place, tighten each bolt throughout the structure to finish assembly.
- Raise the entire structure up to the wall, slightly tilting it toward the wall during the last part of assembly so as to avoid dropping it on yourself.
- Prior to setting up, you should have worked with a contractor to determine the area which to place your Performance Station so that you’ll have reliable studs roughly 48 inches apart to accommodate the mounting points for the brackets. With that established, use appropriate mounting screws for the surface you are working with to secure it safely to your wall.
- Finish your setup by drilling the feet of the Performance Station into the ground to secure all four points of the structure.
